GoogleCloudPlatformでMastodon構築
目次
GoogleCloudPlatformでMastodon構築
この記事ではGCPでのMastodonの構築について書いています。
また、当記事では一般的なMastodonインスタンス(オブジェクトストレージや外部DBサーバーを使わないインスタンス)を作ることを目的にしています。
構築の流れ
- GCPアカウント作成
- VMインスタンスの作成
- SSHログイン用の鍵の登録
- Rubyコンパイル
- 依存パッケージのインストール
- Mastodonのインストール
- Nginxの設定
1.GCPアカウントの作成
ここにアクセスをし適宜情報を入れてアカウントを作成してください。初回登録時は$300クーポンが貰えます。
2.VMインスタンスの作成
アカウント作成が終わったら、Compute engine>VMインスタンスをクリックし、インスタンスを作成します。
リージョンはasia-northeast(東京リージョン)を、マシンタイプはデフォルトのままで結構です。
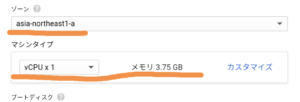
今回はOSにCentos7を使用します。

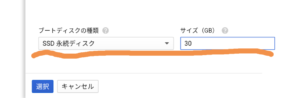
また、ディスクサイズはSSDの30GBにします。(ここはお好みで構いません。後に追加もできます)
HTTP(S)トラフィックを有効にするのを忘れずに
決定を押すと1分ほどでVMインスタンスが立ち上がります。
3.SSHログイン用の鍵を登録
このままではブラウザ上からしかSSHログイン出来ませんので、SSHの公開鍵をGCPに登録してあげます。
まず、Tera TermなどのSSHクライアントでRSA鍵などの適切な鍵を作成します。(ユーザー名、パスワードは必ず覚えといてください。ログイン時に必要になります。)
その後、作成した公開鍵をGCPのCompute engine > メタデータ > SSH認証鍵のボックスに入れ、保存します。
これでSSH鍵を使ってSSHログイン出来るようになります。
4.Rubyのコンパイル
SSHログイン後、以下のコマンドを実行し、Rubyをインストールします。
sudo -i

yum -y update && yum -y groupinstall "Development tools"

yum install -y readline-devel libffi-devel wget

cd /tmp

wget https://cache.ruby-lang.org/pub/ruby/2.4/ruby-2.4.1.tar.gz

tar zxvf ruby-2.4.1.tar.gz

cd ruby-2.4.1

./configure

make

make install
おそらくこれでRubyがインストールされます。
ruby -vでバージョンが表示されたら正常にインストールされています。
5.依存パッケージのインストール
yum install -y yum-utils

yum-config-manager --enable epel

yum install -y http://li.nux.ro/download/nux/dextop/el7/x86_64/nux-dextop-release-0-5.el7.nux.noarch.rpm

curl -sL https://rpm.nodesource.com/setup_6.x | bash -

yum update -y

yum install -y ImageMagick ffmpeg redis rubygem-redis postgresql-{server,devel,contrib} authd nodejs {libxml2,libxslt,protobuf,ffmpeg,libidn,libicu,libpqxx}-devel protobuf-compiler nginx jq bind-utils

npm install -g yarn
次に、データーベースの作成とRedisの起動を行います。
postgresql-setup initdb

sed -i "s/ident/trust/" /var/lib/pgsql/data/pg_hba.conf

systemctl enable postgresql redis

systemctl start postgresql redis

su - postgres -c "createuser --createdb mastodon"
6.Mastodonのインストール
Mastodonユーザーを作成します
useradd mastodon
次にMastodonユーザーにログインし、Mastodonのインストールを行います。
su - mastodon
変数の定義をします。取得したドメインを以下のように入力してください。
export DOMAIN=取得したドメイン
git clone https://github.com/tootsuite/mastodon.git live

cd live

git checkout \$(git tag|grep -v rc|tail -1)

gem install bundler

bundle install --deployment --without development test --path=vendor/bundle

yarn install --pure-lockfile

cp .env.production{.sample,}

export RAILS_ENV=production

SKB=$(bundle exec rake secret)

PS=$(bundle exec rake secret)

OS=$(bundle exec rake secret)

export $(bundle exec rake mastodon:webpush:generate_vapid_key)

sed -i -e "s/^VAPID_PRIVATE_KEY=/VAPID_PRIVATE_KEY=${VAPID_PRIVATE_KEY}/" \

-e "s/^VAPID_PUBLIC_KEY=/VAPID_PUBLIC_KEY=${VAPID_PUBLIC_KEY}/" .env.production

sed -i -e "s/_HOST=[rd].*/_HOST=localhost/" \

-e "s/=postgres$/=mastodon/" \

-e "s/^LOCAL_DOMAIN.*/LOCAL_DOMAIN=${DOMAIN}/" \

-e "s/^SECRET_KEY_BASE=/SECRET_KEY_BASE=${SKB}/" \

-e "s/^PAPERCLIP_SECRET=/PAPERCLIP_SECRET=${PS}/" \

-e "s/^OTP_SECRET=/OTP_SECRET=${OS}/" .env.production

bundle exec rails db:setup

bundle exec rails assets:precompile
これでMastodonのインストールは終わりです。
次にsystemdファイルを書きます。
mastodon-web
cat < /etc/systemd/system/mastodon-web.service

[Unit]

Description=mastodon-web

After=network.target

[Service]

Type=simple

User=mastodon

WorkingDirectory=/home/mastodon/live

Environment="RAILS_ENV=production"

Environment="PORT=3000"

ExecStart=/usr/local/bin/bundle exec puma -C config/puma.rb

TimeoutSec=15

Restart=always

[Install]

WantedBy=multi-user.target

_EOF_
mastodon-sidekiq
cat < /etc/systemd/system/mastodon-sidekiq.service

[Unit]

Description=mastodon-sidekiq

After=network.target

[Service]

Type=simple

User=mastodon

WorkingDirectory=/home/mastodon/live

Environment="RAILS_ENV=production"

Environment="DB_POOL=5"

ExecStart=/usr/local/bin/bundle exec sidekiq -c 5 -q default -q mailers -q pull -q push

TimeoutSec=15

Restart=always

[Install]

WantedBy=multi-user.target

_EOF_
mastodon-streaming
cat < /etc/systemd/system/mastodon-streaming.service

[Unit]

Description=mastodon-streaming

After=network.target

[Service]

Type=simple

User=mastodon

WorkingDirectory=/home/mastodon/live

Environment="NODE_ENV=production"

Environment="PORT=4000"

ExecStart=/usr/bin/npm run start

TimeoutSec=15

Restart=always

[Install]

WantedBy=multi-user.target

_EOF_
コメントはまだありません